Docker on Windows#
Warning
NOTE: This document is a work in progress.
Note
This will only work on a laptop or desktop. It does not work on (university-provided) cloud systems!
Install#
Follow these instructions to install Docker Desktop for Windows.
Pay close attention to the system requirements:
Hyper-V
For anyone using a University computer it may be necessary to run as administrator.
Testing Setup#
Open up a
Command Promptand typedocker --version. If working, it should output a Docker version and build number.In the same shell, type
docker run hello-worldto test if your installation is working correctly. If working, you should get the following:
Hello from Docker!
This message shows that your installation appears to be working correctly.

To generate this message, Docker took the following steps:
 1. The Docker client contacted the Docker daemon.
 2. The Docker daemon pulled the "hello-world" image from the Docker Hub.
    (amd64)
 3. The Docker daemon created a new container from that image which runs the
    executable that produces the output you are currently reading.
 4. The Docker daemon streamed that output to the Docker client, which sent it
    to your terminal.
Note
In contrast to most other documentation in this manual, the examples below use the old Windows Command Prompt, not bash and not PowerShell.
Stata Imperfect Example#
Start Docker Desktop.
Download example project from ICPSR.
Open up a
Command Prompt(cmd) and cd into the workspace folder you would like to place the project contents.In the command line:
Unzip C:/path/to/Downloads/118568.zip.Download data from here - Alaska only.
Unzip into “data” folder.
Test Docker:
docker --versionordocker run hello-world.Navigate to dataeditor dockerhub and click on the Stata version you have on your workspace > Tags > Copy the docker pull command, i.e.:
docker pull dataeditors/stata16:2021-06-09Paste into command line.
Set version:
set VERSION="16"and image:set IMG="dataeditors/stata16:2021-06-09".Test with:
echo %VERSION%Next, cd into the “programs” folder:
cd /programs.Update the globals in
config.doto reflect that the “programs” directory is the current working directory.Run the Docker image:
   docker run -it --rm ^
  -v C:/path/to/stata_license/stata.lic.%VERSION%:/usr/local/stata%VERSION%/stata.lic ^
  -v %cd%:/code ^
  -v %cd%/../data:/data ^
  %IMG%
This opens an interactive Stata session.
Execute the master file:
do master.doHit error:
save `dtahu', replace  /* save housing unit data */
(note: file /programs/../data/outputdata/housing.dta not found)
file /programs/../data/outputdata/housing.dta could not be opened
r(603);
Looks like there’s no folder “data/outputdata/”. A global was already defined for this so we can add
cap mkdir $outputdatato theconfig.dofile to create that folder. Re-runmaster.do.Another error:
command latab is unrecognized. Add the “latab” package to00_setup_stata.doand re-run.No “tables” folder in the root directory to send the output tables to. However, this folder wasn’t mapped to the Docker image so we’ll have to create the directory and map it in our docker run command.
End the Stata session:
exit, STATA clear.Make the tables directory from the command line:
mkdir tables.Adjust the docker run command to account for the results folder:
   docker run -it --rm ^
  -v C:/path/to/stata_license/stata.lic.%VERSION%:/usr/local/stata%VERSION%/stata.lic ^
  -v %cd%:/code ^
  -v %cd%/../data:/data ^
  -v %cd%/../tables:/tables ^
  -w /code ^
  %IMG%
Again, and execute
master.do.Done!
It is also possible to execute the program outside of an interactive Stata session:
Use the following docker command:
   docker run -it --rm ^
  -v C:/path/to/stata_license/stata.lic.%VERSION%:/usr/local/stata%VERSION%/stata.lic ^
  -v %cd%:/code ^
  -v %cd%/../data:/data ^
  -v %cd%/../tables:/tables ^
  -w /code ^
  --entrypoint /bin/bash ^
  %IMG%
Issue the following shell command:
stata -b do master.do
to execute master.do.
Fortran Example#
Downloaded the Intel OneAPI-hpckit by entering the following into the command line:
docker pull intel/oneapi-hpckit:2021.2-devel-ubuntu18.04
Navigate to the directory with all the Fortran model codes:
cd PATH/to/model_codesHit multiple issues attempting to run in Bash shell:
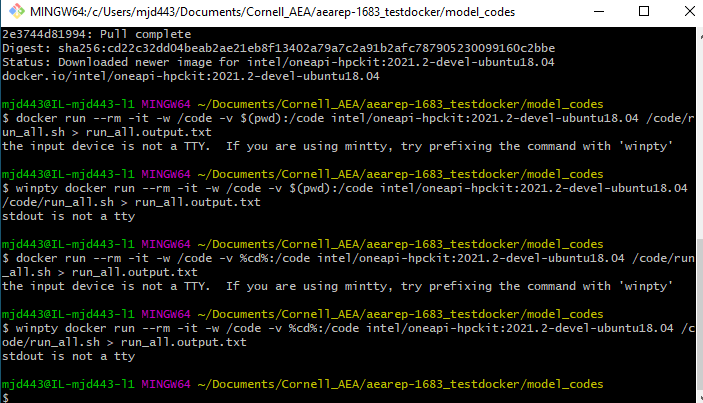
On Windows 10, opened a
Command Prompt(cmd) instead.Typed the following into the command line to run the shell script which executes all Fortran code:
docker run --rm -it -w /code -v %cd%:/code intel/oneapi-hpckit:2021.2-devel-ubuntu18.04 /code/run_all.sh > run_all.output.txt
This maps the current directory (model_codes) to the docker image as “/code” and runs
run_all.sh, creating the log filerun_all.output.txt.
Wait, what is docker and what did we just do?#
Docker is a platform of services for the use of ‘containers’. These containers allow the sharing of programs or apps in isolation of their enviroment. In the imperfect example above, we ‘mounted’ our local folders to the container and then run code inside it using the Stata 16. We did the same thing in the Fortran example, except then we used a Fortran container. It may be helpful to know the difference between a docker image and a docker container.
It may also be helpful to understand the basics of the commands we just run:
docker pull dataeditors/stata16:2021-06-09: This command is pulling the image “dataeditors/stata16” with the tag “2021-06-09” so we can used it in our machine.
docker run -it --rm ^
  -v C:/Users/mjd443/Documents/aea-licenses/stata.lic.%VERSION%:/usr/local/stata%VERSION%/stata.lic ^
  -v %cd%/programs:/programs ^
  -v %cd%/data:/data ^
  -v %cd%/tables:/tables ^
  %IMG%
We used docker run to create a container based on a specified image (dataeditors/stata16) and then start it. Lets undestand some of the options we used:
-iis short for--interactive,-tis short for--ttyand is used for allocating a pseudo-TTY (whatever that means). They are often used together, as we did:-it. They allow us to work interactively with Stata inside the container.--rmis used to automatically remove the container when it exits.-vis used to bind mount a volume. In other words, we are mapping a folder in our machine to where we want that folder to be in the container (-v our/folder:container/folder). So%cd%/programsis our current.directory/programs folder, and we “mount it” in the container, creating a “programs” folder inside it. We did the same for the stata license, as well as for “data”, and “tables” folders.
Note that at the end of the line we have %IMG%, which is a local variable we previously had set to be equal to the image we are using: dataeditors/stata16:2021-06-09". All of that allowed us to have an interactive Stata inside the container with access to the data and .do files that we needed to replicate the project.
In the Fortran example when we used:
docker run --rm -it -w /code -v %cd%:/code intel/oneapi-hpckit:2021.2-devel-ubuntu18.04 /code/run_all.sh > run_all.output.txt
where the option -w sets the working directory inside the containers to a the existing folder called “code”. Then, we “mounted” the current working directory in the host machine to the “code” folder inside the container. We use the image intel/oneapi-hpckit with the tag 2021.2-devel-ubuntu18.04 to create and start a container that run the the bash script as described previously.