Chapter 11 AEA Jira workflow - A guide
For pre-publication verification, we use a Jira-based workflow similar to the post-publication processes described in the Wiki. For AEA work, that post-publication process can be ignored.
11.1 Scope
Your supervisor will assign you to this workflow. This workflow covers code and data, even when data may not be accessible. Supervisor, see other document for details.
- This workflow DOES NOT cover simple metadata assessment of openICPSR deposits, for instance for AEA Papers and Proceedings deposits. See Instructions for Papers and Proceedings.
11.2 Overview

jira image
The following table illustrates the flow and transitions. The transition field identifies the button that will appear in the interface
that needs to be clicked in order to progress an issue from the From state to the To state. The Condition field identifies
which form field needs to be filled out in order to be able to make the transition. Blocked is always an option, and leads to a “waiting state”
until a resolution can be found.
| From | Transition | → To | Condition |
|---|---|---|---|
| Assigned | Start task | → In Progress | |
| In Progress | Download code | → Code | Code provenance have been filled out, Journal has been identified, Empirical Article=Yes, External validation != “yes” |
| Code | Access data | → Data | Git working location, Data provenance have been filled out. |
| Data | Prepare preliminary report | → Write Preliminary Report | |
| Write Preliminary Report | Some data is accessible | → Verification | Location of data, Computing environment have been filled out. |
| . | Data not available | → Code review | Reason for non-accessibility of data has been filled out. |
| Verification, Code review | Prepare report | → Report | |
| Report | Submit for review | → Report Under Review | Report URL has been filled out. |
| Multiple | Need information | → Incomplete | when information is missing |
| Incomplete | Restart | → Code review | |
| . | Restart verification | → Verification | |
| . | Restart task | → In Progress |
The following are only relevant for “Approvers” or “Pre-Approvers” (if you have not been told you are a “(Pre-)Approver”, you are not.)
| From | Transition | → To | Condition |
|---|---|---|---|
| Open | Assign | → Assigned | |
| In Progress | Alternate Workflow | → Alternate Workflow | |
| Under Review | Approve | → Approved | Can only be done by approvers. |
| Pre-approved | Approve | → Approved | Can only be done by approvers. |
| Under Review | Pre-Approve | → Pre-Approved | Can only be done by pre-approvers. |
| . | Incomplete | → Incomplete | n.a. |
| Approved | Done | → Done | n.a | n.a. |
| Blocked | Reopen | → Open | n.a. |
The following are only relevant for “Publishers” (if you have not been told you are a “Publisher”, you are not.)
| From | Transition | → To | Condition |
|---|---|---|---|
| Approved | Submit to MC | → Submitted to MC | MCRecommendationV2 is filled out |
| Submitted to MC | Wait for response on ICPSR | → Pending openICPSR changes | MCRecommendationV2 is Accepted with changes and notes to be added on openICPSR |
| Submitted to MC | Prepare for publication | → Pending Publication | openICPSRVersion is filled out, issue is NOT an R&R |
| Pending openICPSR changes | Prepare for publication | –> Pending Publication | openICPSRVersion is filled out, Changes have been satisfied on openICPSR |
| Pending Publication | Publish | → Published | openICPSRDOI is set |
11.2.1 Notes
- In the Issue form, please also fill out other fields, as noted.
- At any point, you can move the issue to
Incomplete: more information/action is required before you can proceed. You should also notify us of the situation ASAP - When committing, always use Smart Commits, e.g.
JRA-34 #comment corrected indent issue
- Use JIRA to communicate with your supervisor as issues arise, including code that takes a long time to run.
11.3 Details
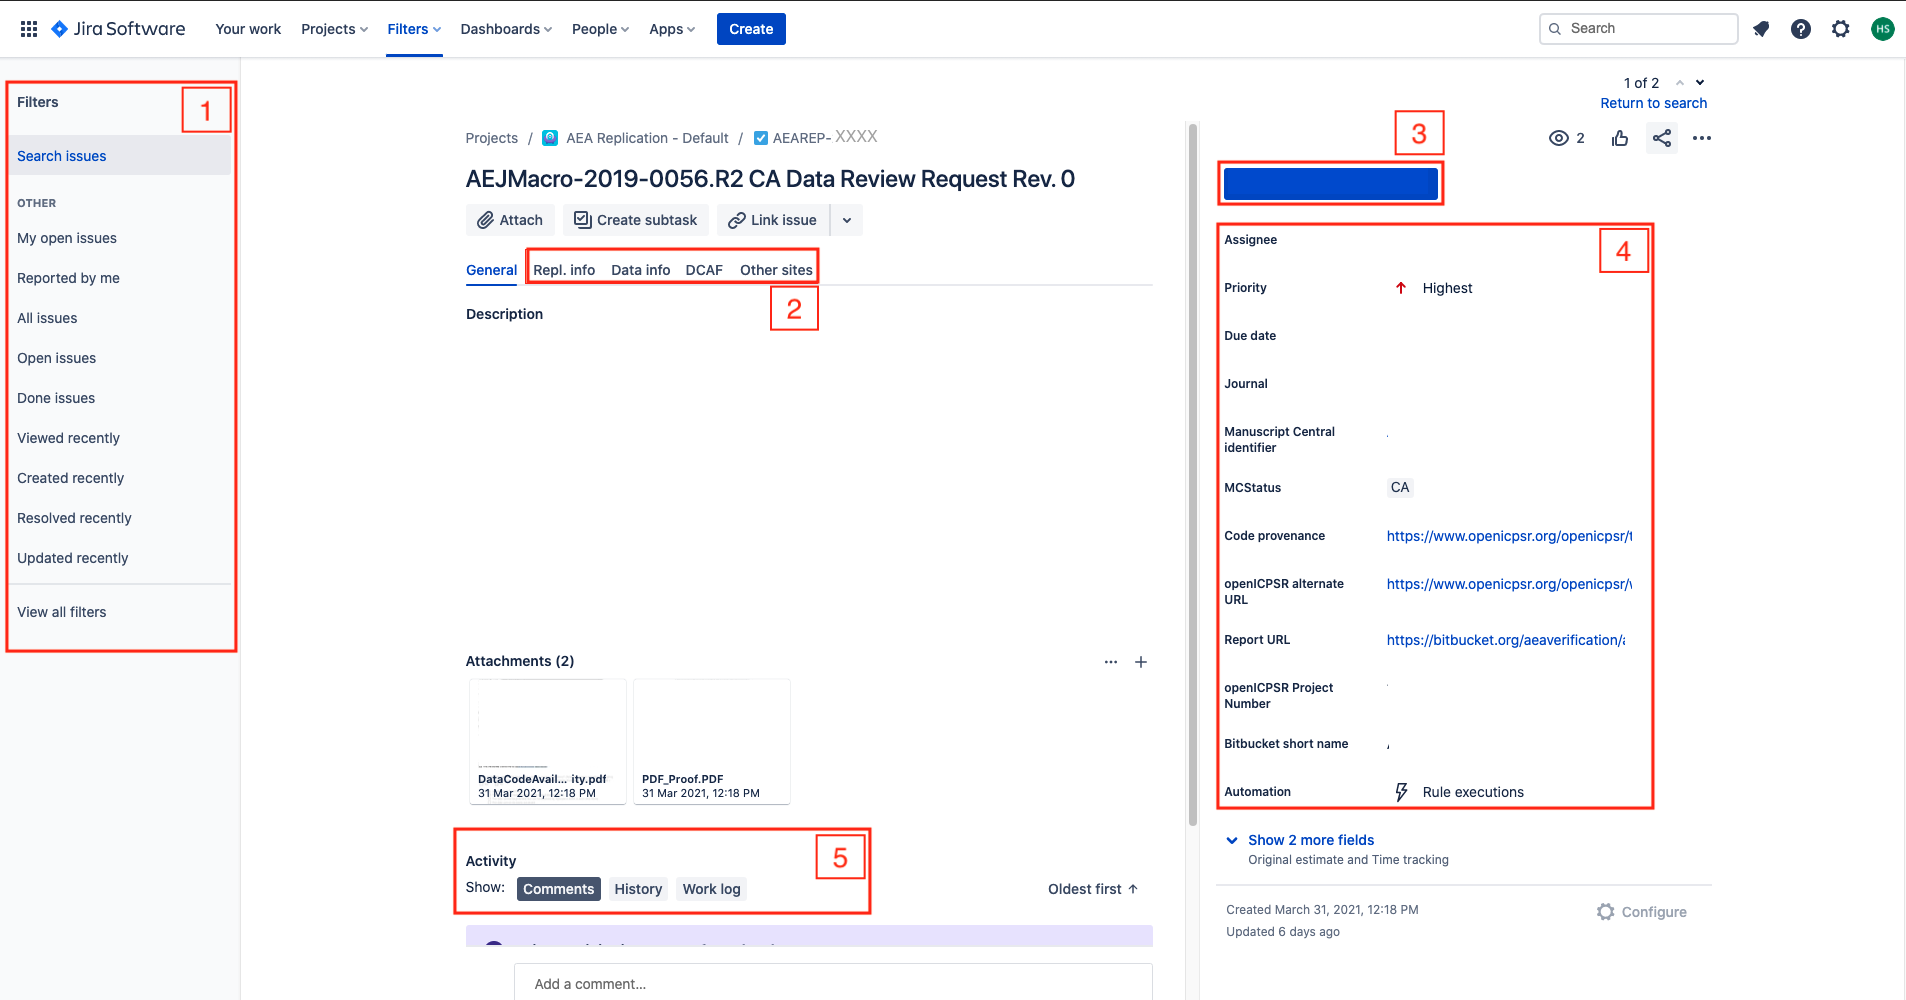
Additional details for each of the key stages are provided here. Below is a screenshot of a Jira ticket. Some things to note:
- The blue
In Progressbox in the upper right - area 3 of the screen - is how you “advance” the Jira ticket. When you are first assigned a replication, this box will sayOpen. - The tall grey bar on the left side - area 1 of the screen - contains several handy links that you will use throughout the process.
- Sometimes this box is not visible. To make it visible, edit the URL for the Jira ticket so that there are no characters after the ticket number (e.g. AEAREP-123). You may have to refresh the page after doing so.
jira screen
11.3.1 In Progress
The first thing you must do is to advance the ticket from Open to In Progress.
- This lets us know that you have started working on replication.
Is the current Jira issue an original report (first time we see the manuscript?) or is it a revision (we’ve seen the manuscript before?)?
-
Check the
MCStatusfield:- If it says “
RR” or “CA”, then it is an “original report” - proceed. - If it says “
CARevision”, then it is … a revision!- Follow the instructions at “Revision reports after author resubmission”.
- In particular, do NOT create a new repository - you will re-use the previous repository.
- In particular, do NOT create “update” or “new” directories The current state of the repository should always correspond to the author’s structure. Overwrite files, delete files. The previous state is preserved in Git. This will also tell you what files have changed.
- When running a second replication on the same archive, please be sure to have the committed “REPLICATION.md” be accurate when you commit it - do not let it contain holdover data from a previous replication attempt, as this can lead to confusion.
- If it says “
11.3.1.1 Creating a repository
-
start by creating a repository using the import method
- copy-paste from this URL: “https://github.com/AEADataEditor/replication-template” to the URL field (this is also available in the Jira dropdown “Shortcuts”)
- the repository name should be the name of the JIRA issue (e.g.,
aearep-123) - Be sure that
aeaverificationis always the “owner” of the report on Bitbucket. - The Project should be the abbreviation of the journal (e.g. “JEP”)
- Keep the other settings (in particular, keep this a private repository).
- Click
Import Repository - Keep this tab open!
![]()
- We have now created a Bitbucket repo named something like aearep-123 that has been populated with the latest version of the LDI replication template documents!
11.3.1.2 Ingesting author materials
We will now ingest the authors’ materials, and run a few statistics. Typically, the materials will be on a (private) openICPSR repository. Sometimes, the materials will be at Dataverse, Zenodo, or elsewhere.
- If at openICPSR, the fields
Code provenance,openICPSR alternate URL, andopenICPSR Project Numberwill be filled. - If at Zenodo or Dataverse, the
Code provenancewill have the DOI of the replication package,openICPSR alternate URLandopenICPSR Project Numberwill be empty.
You will now run what is called a Bitbucket Pipeline. Similar tools on other sites might be called Continuous integration, Github Actions, etc. If you have encountered these before, this will not be news for you, but it isn’t hard even when this new.
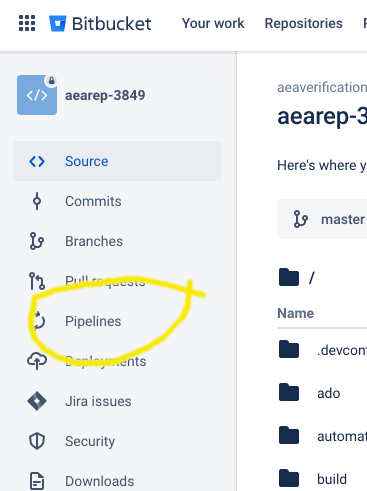
- First, in the repository you just created, navigate to the
Pipelinestab
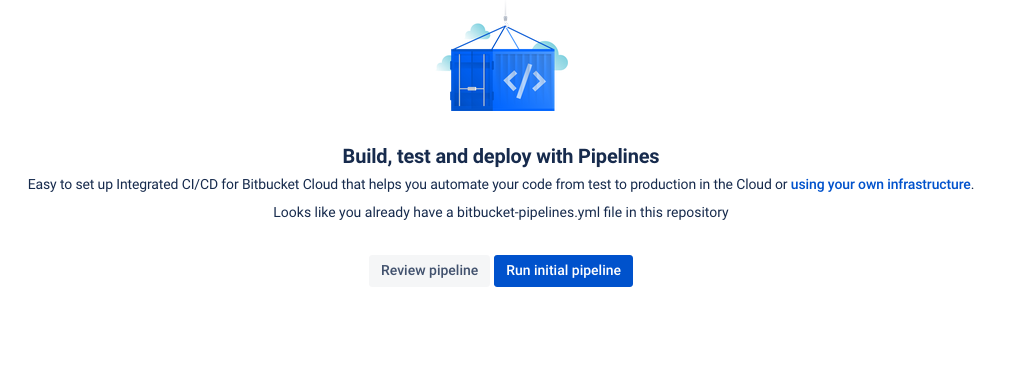
- Because this is new, you will see the “Run initial pipeline” page. Click on
Run initial pipeline.
first-time-run
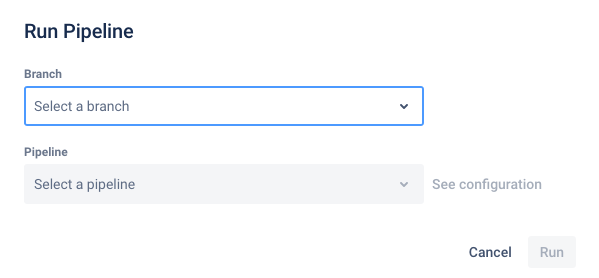
- You will now need to select a “pipeline” to run.
select pipeline
- Choose “
populate from ICPSR” (might change in the future), and fill in the ID for the relevant source of the replication package (here: openICPSR ID =123456), and hitRun.
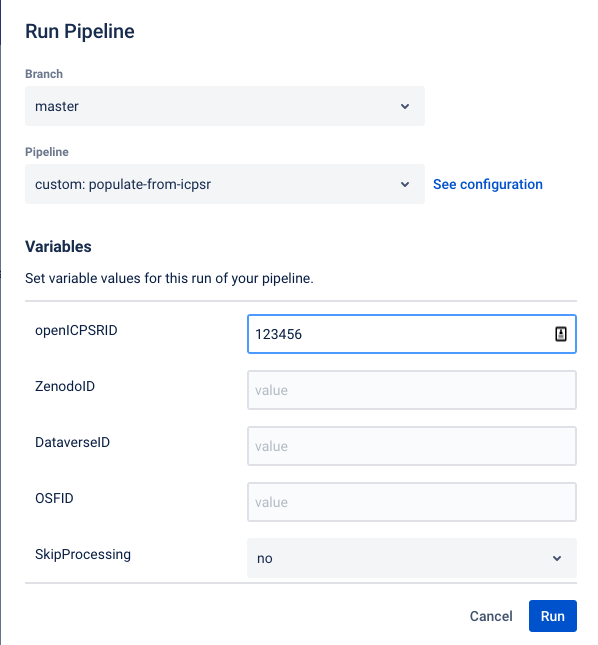
select pipeline
- Your pipeline will start, working through various steps. This might take a while! Do the next step (Collecting Information) then come back here.
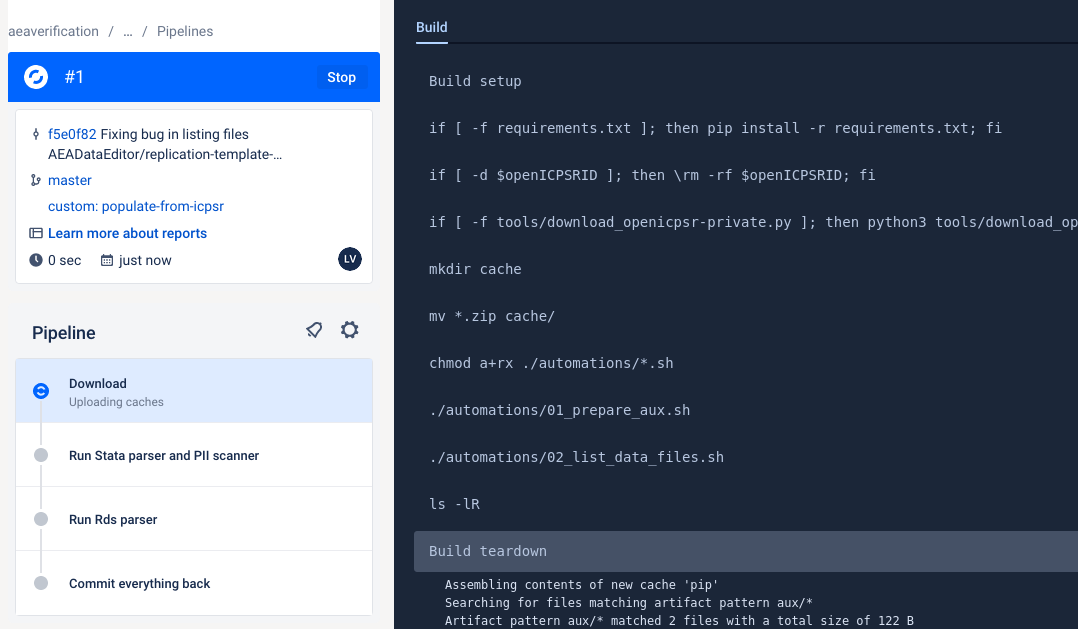
running pipeline
-
Once your pipeline is done, check that it is green.
- If for some reason, it fails, the logs are available for your supervisor to inspect, and to help you. You may then need to do the manual steps later.
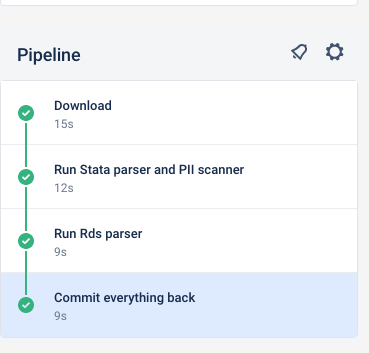
completed pipeline
11.3.1.3 Collecting information
At this stage, you are collecting information.
-
Fill out the following fields in the Jira ticket (some may be pre-populated):
-
Code provenanceIn almost all cases, this is the openICPSR repo for which you will have received a notification email.- If code and/or data are provided by email,
Code provenanceshould be filled out with “https://email”, otherwise with a DOI or URL.
- If code and/or data are provided by email,
-
Journal -
Manuscript Central identifier -
Bitbucket short name(e.g.,aearep-123)- this should then auto-fill
Git working location.
- this should then auto-fill
-
- The following fields, located in the REPL. INFO tab area 2 of the screen, must also be filled out:
-
Empirical Article: “Does the article contain empirical work, simulations, or experimental work?”- typically the answer should be “Yes”. You should answer “No” only if you read the article and find that it is entirely theoretical, no simulations or empirical work at all.
-
RCT: Is the paper about a randomized control trial? This should be immediately obvious from the abstract.RCT NUMBER: If it is an RCT, fill in the associated RCT registration number (typically in the title page footnote)
-
You can now proceed to change the status to Code.
11.3.2 Code
In this stage, you will download the code, inspect the authors’ README, and should anything have failed in the automated steps above, correct for that manually.
You now need to decide where you are going to do the data analysis - that should be the place you do the next few steps. Choose one of these environments to customize the instructions:
This is because the git setup we use does not allow you to include the data files in the Bitbucket repository, so when you download the replication package from openICPSR or elsewhere, they do not get added to the Bitbucket repository.
11.3.2.1 CISER
-
Clone the Bitbucket repository onto the computer you are working on (
git clone https://yourname@bitbucket.org/aeaverification/aearep-xxx.git) -
From the JIRA issue, download and add Manuscript, Data and Code Availability Form (DCAF).
- Download from Jira issue attachments. The manuscript is often called
PDF_Proof.pdf.
- Download from Jira issue attachments. The manuscript is often called
-
Add the manuscript, and any response by the authors (if a revision)
- Add them to the Git repo (e.g.,
git add PDF_Proof.pdf DataCodeAvailability.pdf)
- Add them to the Git repo (e.g.,
-
Be sure to
git pushit all to Bitbucket, with a meaningful commit message.
11.3.2.2 Github Codespaces (CS)
All actions in Github Codespaces (CS for short) will be performed in Visual Studio Code (VSC): the left pane for file and Git actions, in the Terminal, or in the text editor. To connect to CS, see [instructions to come]. It is assumed that you will run this from your laptop, but it can be run from any internet-connected computer.
-
Use the Terminal built into VSC (
Menu->Terminal->New Terminal) -
Populate CS with the Bitbucket repo (yes, this is a bit weird)
- Use the LDI short-cut command
aeagit 123to clone the Bitbucket repository foraearep-123onto CS (this executedgit clone (URL)/aearep-123behind the scenes).- If this is the first repository you run on this CS instance, you may need to configure authentication. Follow the instructions from the
aeagitcommand. - Once the
aeagit 123has completed, it will open a new VSC windows. All subsequent actions should be done in that window.
- If this is the first repository you run on this CS instance, you may need to configure authentication. Follow the instructions from the
- Use the LDI short-cut command
-
Add the manuscript, and any response by the authors (if a revision)
- Copy the manuscript to the CS. There are two ways to do this:
- Drag-and-drop the downloaded manuscript into the file pane of VSC.
- Use the
ghcommand line tool from a non-VSC terminal (on your local computer):gh cs cp PDF_Proof.pdf remote:/workspaces/aearep-123
- Add the manuscript to the Git repo
- In the terminal:
git add PDF_Proof.pdf; git commit 'Manuscript'; git push - Or use the VSC Git tools
- In the terminal:
- Copy the manuscript to the CS. There are two ways to do this:
11.3.2.3 Manual steps
If neither of the other two methods work, try this method (typically, on CISER)
-
Download the code (and data) from openICPSR (typicaly for most cases). See openICPSR repositories for instructions on downloading these materials. Typically called
111234.zip.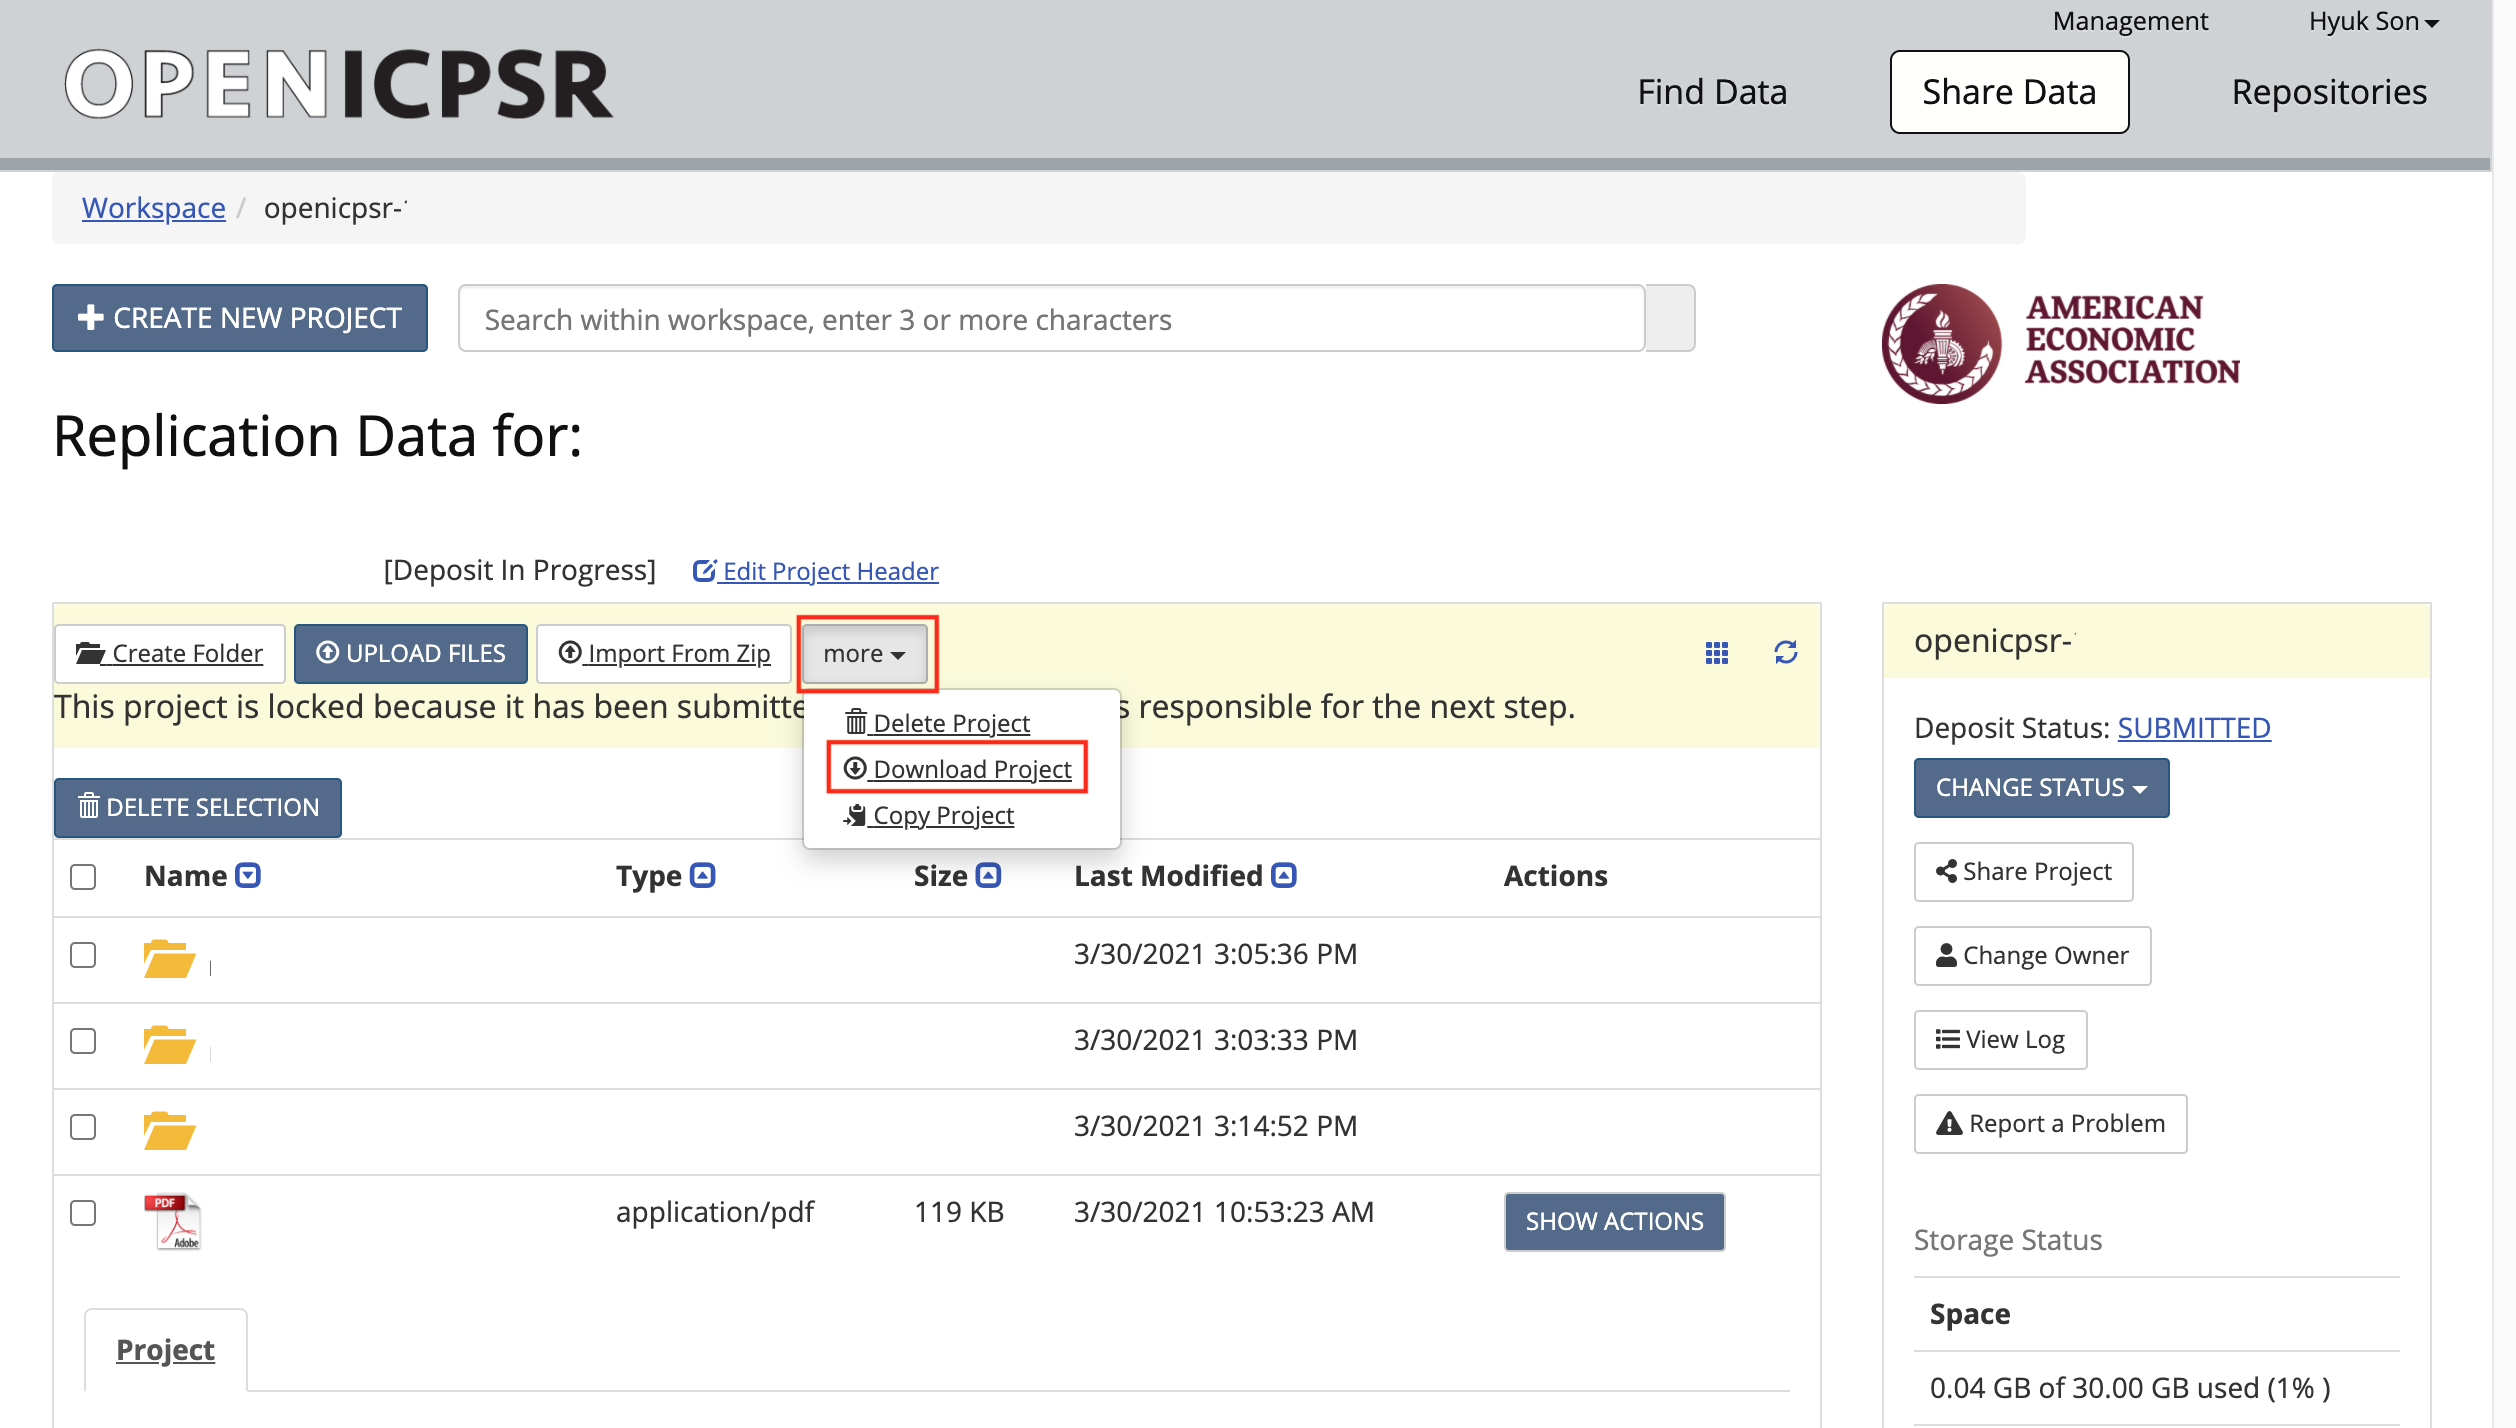
- Copy/paste the downloaded openICPSR ZIP file into the local copy of the
aearep-123repository- The ZIP file should be called something like
111234.zip. Note: it might look like a folder, but it is not! (on Windows) - The ZIP file will be wherever your browser downloads materials - probably your
Downloadfolder.
- The ZIP file should be called something like
- The local repository should now have the relevant LDI replication template materials and the openICPSR ZIP file containing the replication materials provided by the authors.
- Copy/paste the downloaded openICPSR ZIP file into the local copy of the
-
If uploading to CS, copy the downloaded ZIP file into the CS. There are two ways to do this:
- Drag-and-drop the downloaded openICPSR ZIP file into the file pane of VSC.
- Use the
ghcommand line tool from a non-VSC terminal (on your local computer):gh cs cp 111234.zip remote:/workspaces/aearep-123(adjust accordingly)
-
Unzip the openICPSR folder under a folder named for the openICPSR repostory number.
- On Windows, right-click and select “Extract all”. When asked, do not overwrite files.
- On OSX, double-click. When asked, do not overwrite files.
- From bash:
unzip -n 111234.zip -d 111234 - The individual files that are part of the replication package should now be in a subdirectory (e.g,
111234, the openICPSR repository number). - Perform a
git add:git add 111234should do the right thing. - Perform
git commit,git pushsequence to populate the Bitbucket repo with the authors’ replication materials (see above how to handle data).
Clean-up: Delete (
git rm) unused files from the template!- Example:
git rm README.md template-config.Rif the replication archive does not contain any R files (you can do this at any time before writing the Preliminary Report)
- Example:
The root of the repository should contain only our files (i.e., REPLICATION.md, etc.), the manuscript files (main manuscript, any online appendices and README files provided through the JIRA ticket), and the code.
Example:
111234/
code-check.xlsx
config.do
PDF_Proof.PDF
PII_stata_scan.do
DataCodeAvailability.pdf
REPLICATION.md
git commit,git push…Be sure to
git pushit all to Bitbucket, with a meaningful commit message.Check with
git statusthat there are no uncommited files.
11.3.3 Verifying completeness of the README
The first section of the Replication report is titled “General”. Here you want to verify how complete the README is.
- Go through the entire README, and compare both to the template README and the sections in the General section.
- Check off the sections for which you appear to have information.
- Leave blank the sections that are either not provided, or that are empty
- In JIRA, identify the question called “
DCAF_README_compliant”.- If all or most of the sections are in the same order, and are filled with meaningful information, then check
Fully - If information is provided, but in different order, or only mostly, mark “
Content only”. - If very little of the information is provided, mark it as “
No”
- If all or most of the sections are in the same order, and are filled with meaningful information, then check
11.3.4 List of Data Sources
Now you will establish a list of data sources used.
- Please check the Data and Code Availability Form.
- The form should be attached in the JIRA ticket.
- In area 2 of the screen, choose
DCAF.- Open the Data and Code Availability Form, and check if all blanks are filled out.
- Once you checked the form, and in particular, if the checkbox next to “README” is checked, choose “
Yes” from the dropdown menu ofDCAF_README_checkedcell. - If the answer to the following question at the bottom of the form is “Yes”, then, choose “
Yes” from the dropdown menu ofDCAF_Access_Restrictions. Otherwise, choose “No”. “Is any of the data used in this manuscript subject to access restrictions?”
What is the difference between a “data source” and a “dataset” or “data file”?
- A data source is more general. A data source may provide multiple data files. One example is the “Current Population Survey”.
-
A dataset or data file is a single file that appears in the replication package. An example is “
data_cps.dta”, which is presumably the data file containing the Current Population Survey.
For this section, you should list data sources.
- From the README provided by the authors, the data section of the article itself, or an appendix, establish a list of data sources used in the article. For each data source
-
write the corresponding
Data descriptionsection of REPLICATION.md. This should provide detail about the datasets- If data are cited, copy and past the citation to the replication report, clarify which one you are referring to. Be sure to check AEA Sample References and the additional guidance to be sure it is a data citation, and not a citation to an article or a document describing the data!
- check any provided URL, and verify if there is a “Data Use Agreement”, “Citation requirement”, “License” on the web page. Check any such data use agreement for conditions. These may require that the authors cite a particular paper, or cite the data in a particular way (check this), or that the authors may not actually redistribute (provide) the data (check this!). If you have doubts, check with your supervisor.
- Check that there is enough information to obtain the data in the README. Based on the README, you should be able to find, on the linked website, the data that you would need. (Ignore at this point that the data might be provided)
-
write the corresponding
-
Add the list of data sources to the repository by committing the preliminary version of the REPLICATION.md (
git add,git commit,git push) -
Fill out the
DataCitationSummaryfield indicating how many data citations are in order:all,some, ornone. -
Fill out the
Data Provenancesection- Are the data in the openICPSR repository, or are they someplace else? “Various” is a legitimate answer if data are in various locations.
- Please refer to Chapter 9 A guided walk through the Replication Report for more details about which data sources to include and how to assess the provided information.
11.3.5 Other information
Have a look at the README again.
-
Is there information about Requirements?
- Is there information about the software?
- How long does the author say the code will run?
- How much memory, or processors, does the code need?
- This may tell you if you, or somebody else, will need to run the code, and whether CISER, or someplace else, is a good place to run the code.
11.3.6 Review of Code
Now do a first pass through the code files provided:
Do NOT run any code!
- review the code in detail.
-
In the template, you will find code-check.xlsx.
- Use this to create a list of all Tables and Figures in the paper, and use this to guide you in REPLICATION.md.
-
Fill out the “Code Description” section of the REPLICATION.md
- Provide some information about the program files (are there 3 Stata files? Are there 5 Matlab programs?). You will use this information to fill out the
Software Usedlater as well, but provide details here.- You can use the file "
generated/programs-list.txtto help you here.
- You can use the file "
- Did you have difficulty aligning the README with the files? Does the sequence suggested by the programs differ from what’s written in the README?
- Are there files in the archive not explained in the README?
- Copy-and-paste the code-check.xlsx into the code description part, listing the programs. Omit the “Reproduced?” Column in doing so. Use the Excel-to-Markdown plugin for VSCode.
- This table will be pasted in under “Findings” again, with “Reproduced?” column, once code has been run.
- Provide some information about the program files (are there 3 Stata files? Are there 5 Matlab programs?). You will use this information to fill out the
Next fill out the following fields in the Jira ticket:
-
BITBUCKET SHORT NAME- if not already done earlier
Commit!
You can now proceed to change the status to Data. As you select that transition, you will be asked various questions:
-
Software UsedStart typing the name of the software program you will use for the replication. Software that have been used in the past will show up as options (e.g. start typing “Stata” and you will see it pop up). -
PROGRAMSEQUENCEDoes the README tell you the correct sequence for running the code? -
PROGRAMSDOCUMENTATIONAre the provided programs well commented? Are they documented in the README? -
PROGRAMSSTRUCTUREMANUALDoes the README note any manual changes that you need to make to the code in order for it to run?
11.3.7 Data
11.3.7.1 CISER
-
On CISER, the data will be stored locally.
- In some cases, you may be asked to use (restricted) data on the S: drive. Follow instructions as you receive them.
-
Download the openICPSR data (if not already done in the previous step, and if available).
- Manually, see Manual steps above.
- From Git bash:
python tools/download_openicpsr-private.py 111234 - Then
unzip -n 111234 -d 111234, which should unpack the data files only, not overwriting anything else.
- attempt to download data from various sources indicated by the authors, but ONLY if no sign-up/ application process is involved.
-
If there is data: Run the PII-checking code, review the output, and record the result in the
REPLICATION.md.- This may already have been generated, check
generated/pii_stata_output.csvandgenerated/PII_stata_scan_summary.txt.
- This may already have been generated, check
11.3.7.2 Github Codespaces (CS)
- Be sure you still have the Bitbucket repository clone, if not, follow instructions under Code
-
Download the openICPSR deposit using the LDI short-cut command
python3 tools/download_openicpsr-private.py 111234- The ZIP file should now be in the same folder as
REPLICATION.md.
-
Unzip the openICPSR ZIP file againto a folder named for the openICPSR repostory number.
- In the terminal
unzip -n 111234 -d 111234
- In the terminal
-
Upload data that you obtained from other sources to CS. There are two ways to do this:
- Drag-and-drop the downloaded data file into the file pane of VSC, into the appropriate location.
- Use the
ghcommand line tool from a non-VSC terminal (on your local computer):gh cs cp datafile.dat remote:/workspaces/aearep-123/111234/data/location(adjust accordingly as per the author’s instructions)
-
If there is data: Run the PII-checking code, review the output, and record the result in the
REPLICATION.md.- This may already have been generated, check
generated/pii_stata_output.csvandgenerated/PII_stata_scan_summary.txt.
- This may already have been generated, check
-
You should check the output - it is not automatic.
- You should use words, and examples, from the output if it looks like there is Personally Identifying Information (PII) like names, addresses, etc. in the output.
- The author will NOT see the output from the program unless you copy relevant parts of it into the report.
-
Describe the data
- do relevant variables have labels?
- Is the data readable?
-
Is the data in archive-ready formats (
csvortxtare the preferred formats by librarians, butdtaorspssare also OK;matfiles are discouraged)
Fill out the following Jira fields:
-
DATA PROVENANCEWhere, specifically, are you accessing the data? Typically this is the openICPSR repo URL (same asCODE PROVENANCE), but may be a user-provided URL or DOI.- if the data is in multiple places, enter “Multiple” here, and record the details in the REPLICATION.md
-
WORKING LOCATION OF THE DATAWhere did you put the data? Examples: CISER, laptop, or Git LFS, or somewhere else
You can now proceed to change the status to Write Preliminary Report. You will be asked to provide additional information:
-
DATASETSINCLUDEDAre all datasets included as part of the replication package (on openICPSR or, if not using openICPSR, on the other repository)? -
DATAAVAILABILITYACESSDo the data require users to apply for access, purchase, or otherwise sign or enter into agreements to access the data? This could be a license agreement, or even a click-through acknowledgement. (This should be mentioned in the Readme PDF or in the article) -
DATAAVAILABILITYEXCLUSIVEAre there data that are only accessible to the author (nobody else)? -
REASON FOR NON-ACCESSIBILITY OF DATAFill this out for any data that is not accessible/ not included as part of this archive; check all that apply. This should be clear from the authors’ descriptions (in the README)Too big: The data can be accessed elsewhere, but they are too big for this replication packageApplication process: In order to access the data, an application needs to be made to an institution (not a purchase).Cost: It costs money to obtain the data. This may be because it has to be purchased, or because there is a fee for the application process.Confidential data: The data are sensitive / confidential and are therefore not made available in this replication package. They can be available elsewhere, subject to conditions.Proprietary data: The data “belong” to somebody - a company, or in rare cases, a specific author, and cannot be redistributed.Licensed data: A license must be obtained. This can be different than an application process (generally, less complicated).Redistribution not authorized: Often, even if data are not confidential, not proprietary, etc., there may be redistribution restrictions. An example are some IPUMS data, as well as many others.Other download site provided: When data can be downloaded elsewhere, possibly due tolicensesorapplication process. In other cases, even if they could be provided, they may already be archived elsewhere, and are not included here.Not found: This should be checked when data cannot be found as per the instructions by the author. This is rarely a final finding for pre-publication verification.
-
NUMBEROFDATASETSHow many datasets are used in the article (whether or not they are included in the replication package you downloaded)? This is meant to include datasets that you are asked to download, or that you were given access to via the “S:” drive, or “CRADC”, or some other secure mechanism.
11.3.8 Write Preliminary Report
At this stage, you need to fill out the REPLICATION.md up to the “Replication steps” part.
- There is sample language for commonly encountered problems in the sample-language-report.md, which is part of the replication package.
- Select an appropriate tag, and copy-paste into the REPLICATION.md
- Commit this preliminary report to the Bitbucket repository.
This stage allows for earlier identification of issues that might warrant changes to the procedure.
- This is the stage where you might have identified that some, but not all data are not provided, and we can undertake steps there.
- You might also have concerns about the REQUIREMENTS - the code might require software that you do not know how to use, or that is not available.
- The authors might have identified computational requirements that you do not have access to, or do not have the time to run (“compute cluster with 100 nodes”, “Fortran compiler”).
- You may want to identify packages that needs to be installed. To help you with this task, we provide a tool called “scan_packages.do” for STATA programs. Instruction for using this dofile is in Appendix G.
Commit!
git add REPLICATION.md
git commit -m "Preliminary report"
git push
!! If you identify any of the elements above that prevent you from completing the issue on time, you should notify your supervisor. DO NOT ADVANCE THE TICKET!!
- Otherwise, advance the ticket to one of three options:
Verification,Code Review, orIncompleteVerification: at least some of the data is accessible. In order to progress to this state,-
Working location of datahas to be filled out -
Computing environmenthas to be selected.
-
Code Review: none of the data is accessibleIncomplete: more information/action is required before you can proceed
11.3.9 Verification
In this stage, you are verifying the code, by using the provided data, or by inspecting the completeness of the source code. The REPLICATION.md is the report.
Keep a log of what you do, what you find, and what does not work, in the REPLICATION.md, under Findings.
- For codes using STATA, we provide a template of config.do in the repository. It creates log files and saves it in the repository. Instructions for using config.do is in Appendix F
11.3.9.1 CISER
- If using Stata, see Stata related procedures.
- If using Matlab, open up Matlab. This might take a while.
- If using Python, we suggest in general to use
git bash, but you may also be able to use the Python shell. Consult with your supervisor, or the CISER helpdesk.
Consult the Replication Wiki for some help in debugging:
11.3.9.2 Github Codespaces (CS)
- If using Stata, see Stata related procedures for how to prepare files. However, you will use the command-line to run Stata.
- To run Stata, type
stata-mp -b do main.do(adjust to account for whatever the program or programs are called). You can do this for every one of the programs.
- To run Stata, type
- To run R, type
Rscript program.RorR --vanilla < program.R > program.Rlog 2>&1(which will always create a log file) - To run Python code, type
python3 program.pyor whatever the authors specify. - If you need other versions of Stata, R, Python, etc. (e.g. Stata 16), you may need to choose a different CS environment that allows to run Docker. See Docker tips
Do not forget to add files output by the code to the repository (log files, figures – eps, png, pdf – and tables – tex, txt, xlsx, xls). Typically (but not always), you can type git add * to add any allowable files, but careful with large data files, and sometimes code will output .txt files, which you have to force-add: git add -f name.txt.
You should commit your report with intermediate results as you have them. Do not wait until you have all the results finished. Commit frequently!
Add (report, modified files)! Commit! Push!
You can now proceed to change the status to Writing Report.
11.3.10 Code Review
In this stage, you are verifying the code by inspecting the completeness of the source code. In general, your ability to detect any issues is limited, but go through the code one more time, and identify
- packages that are installed late in the code, but not mentioned in a setup program or the README
- commands that your experience shows require packages to be installed, but are not mentioned.
Note that in this stage, “Working location of data” and “Computing environment” section in the report are not relevant, so write N/A for these sections.
The REPLICATION.md is the report.
Add! Commit! Push!
You can now proceed to change the status to Writing Report.
11.3.11 Writing Report
At this stage, you will write the final version of the report.
- There is sample language for commonly encountered problems at the Fragments for REPLICATION.md link in the tall grey bar
- Clean up the REPLICATION.md - it should be factual, objective, and not written in the first person.
- Copy-and-paste the code-check.xlsx, including the column “Replicated?” and any notes column, into the “Findings” part. Use the Excel-to-Markdown plugin for VSCode.
- Delete all of the instructional lines in REPLICATION.md before finishing the report.
- When there are differences: Include images of figures and screenshots of tables (both paper and as-reproduced) in the report
- Highlight differences:
- if only a small number of table entries: mention them by table in the report
- if a larger number: Highlight on the reproduced images (of figures, screenshots of tables) the differences you have observed
- Check that the
DataCitationSummaryfield is filled out indicating how many data citations are in order: all, some, or none.
To complete this stage, enter the direct URL of the report, i.e., in the relevant repository (if not already pre-filled):
https://bitbucket.org/aeaverification/aearep-123/src/master/REPLICATION.md
You can now submit your report for review by changing the status to Under Review
11.4 Reviewing Reports
“Approvers” and “Pre-approvers” will review the reports, and finalize the Summary. In particular, approvers must select/confirm one of the recommendations (field MCRecommendationV2):
- Accepted - the manuscript moves forward in the publishing workflow on Manuscript Central, the Data Editor does not see the manuscript again.
- Accepted with changes - same, but some conditions may be imposed. However, the Data Editor does not need to see the manuscript again.
- Revisions requested - manuscript ready - Some revisions need to be made, and the Data Editor needs to see the authors’ response. However, the manuscript can move forward in the publishing workflow. This is rarely used, but opens up the possibility that the managing editors can pull out a manuscript from this category to move forward, depending on the backlog for publication.
- Conditional Acceptance - the Data Editor expects to see a response from the authors to the report.
- Revise and resubmit - the Data Editor has detected a serious problem which needs to go back to the “Revise and resubmit” phase of the publishing workflow. This is only invoked if there are significant concerns as to the validity of the manuscript’s conclusions based on the reproduction attempt. Rarely used.
See Report review guidelines and Preapprovers for details.
11.5 Publication
Once all review rounds have been completed, the last revision will lead to a recommendation of “Accepted”. The Data Editor’s staff prepares the openICPSR deposit for final publication. In general, this means that a note is added to the “Project Communications Log” on openICPSR, denoting the acceptance of the deposit. The AEA publication staff can subsequently move this issue forward to “Published” when the supplement has been published on openICPSR.
- The field
openICPSRDOIis pre-filled, but should be checked by the AEA publication staff.
See Preparing for publication for details.
This currently works reliably only for openICPSR. This documentation will be updated when it works for Dataverse and Zenodo as well.